Custom Twitch Alerts
Whether you are just starting your streaming career, or you’ve been streaming for years at this point, setting up custom Twitch alerts can help bring your channel together into a neat and cohesive experience for your viewers.
Let’s look at how you can customize your Streamlabs alert box to get your alerts just how you’d like them. We’ll also go over a couple of tools that I used to create my alerts so you don’t have to waste hours looking for these resources like I did!
How to create custom alerts for Twitch
You can create alerts in Streamlabs using their assets or add your own assets that you’ve custom made, downloaded elsewhere, or hired someone to design for you. You also have the option to customize your alerts in the Streamlabs software or on their website by logging in using your streaming platform.
I recommend testing your alerts when you don’t have streams scheduled to make sure you don’t overwrite any of your current settings when you’re in a time crunch. Set aside a specific time to make these changes off stream in case you can’t finish in one go so your alerts aren’t broken for your next stream. I will also cover a way to set up a test alert box if you want to skip ahead and do that now.
Customize your alerts within Streamlabs
To start customizing your Streamlabs alerts, create a test collection and add any scenes that you are planning to use. You can duplicate your current scene collection or start from scratch while working on your alerts.

Add an alertbox from the source list and open the settings for your alertbox. You can start by setting the alertbox to your desired size at the top left, set a custom frame rate, and work on your global settings at the top of the menu on the left of the settings screen. You can test your alerts at any time along the way by clicking “Test Widgets” at the top right of the settings box.
To start customizing your twitch alerts within Streamlabs, start by expanding the selection for your desired alert on the menu to the left. I’ll use hosts for this example, as I’m using some of the Streamlabs Prime assets for this alert. Let’s go over the Sources and Settings menu one option at a time to cover all our bases.
Sources and Settings
- Layout: Select from one of the three layout options – Image/gif above text, image/gif behind text, or image/gif to the left of text.
- Title Message: The title message is the text that you set to appear as specified in the layout option. You can customize the message template, font, and text color here.
- Media: Under the media settings, you can select an image or video file (including GIFs), as well as the sound file that you want to play whenever your alert is triggered. Streamlabs offers a library of media under the stock files, or you can upload your own GIFs, images, and sounds to be used in your alerts.
- Animation: The animation settings will determine how your alert is displayed. This allows for a decent amount of customizability when creating your own alerts. You are able to edit how the alert enters and exits the scene, the duration of the alert, text animation styles, and text delay.
- Alert Settings: Here you will select alert triggers and variation conditions/amounts.
Keep in mind that some alert types will have different settings, so you will want to dig through each settings tab to make sure everything is to your liking.
Customize your Twitch alerts on the Streamlabs website
Using the Streamlabs website to customize your alerts is very similar to doing it in the software; however, there are some differences and a few key things to keep in mind.
- You need to click save at the bottom of your screen once you are done editing your alert.
- Everything is laid out in an easier to use fashion, in my opinion.
- You can set up alert variations at the bottom of the page, which allows for you to randomize your alerts.
- There is a test function directly from your browser that will push through to your SLOBS software session. Sometimes this is buggy, and you have to save your alert before testing to be sure your changes have gone through.
You can also view themes directly from the Alert Box tab on the Streamlabs site, and navigate to your Widget Themes at the top of the page. The Widget Themes page allows for you to set up alerts in multiple styles, so you could switch from one to another with a few clicks. Think having alerts set up for different games you play, or setting up new themes for holidays, special events, tournaments, etc…
Customize your alerts with CSS, HTML, JS, or Custom Fields
If you know the basics of coding, you can use the HTML/CSS editor to change basic properties for your alerts.
- Select the alert that you want to add custom code to
- Select HTML CSS in the alertbox settings
- Toggle the “Enable Custom Code” slider to on.
- Find and replace OR add custom code to adjust your alert properties to your needs.
If you need to brush up on your coding, or if you know exactly what you need to change but you don’t know how, W3Schools is a great place to learn. It can teach you anything from the basics, to advanced coding, and even gives you hand on experience with the “try it yourself” feature built into their lessons.
Warning: editing your alert HTML, CSS, or JS may break your alerts. Always test after changing these settings and feel free to reset to default if you get stuck. Documenting changes that DO work can be a good idea to help prevent loss of work caused by future changes.
Create and customize your own alerts
If you are anything like me, graphic design may be way down the list on things you’ve been gifted with in this life. The good news is, there are tools out now that make it easy to bring your vision to life. I have been using Canva for a little while now, and it allowed me to do a full channel rebrand in a matter of hours. I would highly recommend it if you want to make simple yet sleek alerts like these.


These alerts drop down from under my webcam frame and play a very short sound so that they can be played back to back without sounding ridiculous. They are also set up on a custom secondary alertbox, so they won’t interrupt things like raids or hosts. Speaking of multiple alert boxes…
How to set up multiple alert boxes
There may be some cases where you will want to have two alert boxes running at the same time. In my case, I have 2 alert boxes set up. One source is for follows, subscriptions, and bits that shows up under my webcam banner – the other is for everything else and shows up mid screen. This allows for a raid alert to play out for its duration, while simultaneously showing the alerts tied to the secondary alertbox.
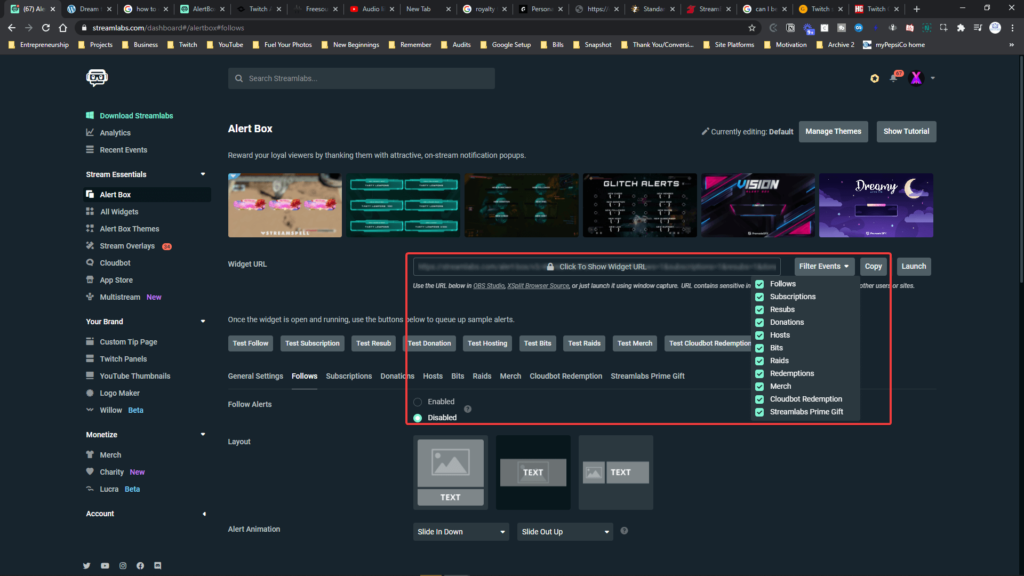
To set up multiple alert boxes, you will have to customize an alert box through the Streamlabs website. Once you have everything set up, you can filter which events you want to play through that specific alertbox, and link it to your scene by adding a browser source. You could literally set up a separate alertbox for every single event type if you need that kind of versatility!
Set up everything as you normally would for each of your alerts first, then select the “Filter Events” dropdown box. Select any of the events you want attached to this specific alertbox, and then copy the link.

Create a new browser source in your Streamlabs scene and paste the URL for your custom alertbox into the URL section. Size it as needed, and select whether or not you want the source to shut down when not visible, as well as whether it should refresh the browser when this scene becomes active.
And voila! You now have a custom alert box that you can move wherever you want on your stream, and will only activate for your selected events.
How to customize Twitch alert sounds
I briefly touched on alert sounds previously, but it merits its own section in this post. When you are editing any specific alert, under the Media section, select “CHANGE MEDIA” on the sound file to pick from a list of sounds to use with your custom alerts.
Use Streamlabs built in alert sounds
Streamlabs has a number of free sounds that you can use with your alerts. You can access premium sounds and music alerts as well by subscribing to Streamlabs Prime.
Download royalty free sounds
You can download sounds to use in your custom alerts from royalty free sites like Freesound, ZapSplat, or Epidemic Sounds. If you want to use music for an alert StreamBeats is a great option, as is the YouTube Audio library that you can find under the YT Studio for your channel. Some of these options are free, while others require a subscription.
If you use these sources in any capacity, check the terms and conditions for whether you need to credit the site for usage and how you would go about doing that. You can get DMCA strikes for sound effects, so it is always best to be sure you are following T&C when using sounds that don’t belong to you.
Create your own sounds
If you want to create your very own sounds to use with your custom alerts, there are many ways you can go about this. You could pull a sound from one of your clips or VODs, or you can create your own custom alert sound using a separate software like Audacity.
Creating your own alert sounds will help you avoid those pesky DMCA strikes, mutes, or even deletions of your VODs.
In conclusion
Customizing your Twitch alerts can seem like a daunting task to say the least. The information is out there, but it isn’t clear and concise. I wanted to write this article to make the process as simple as it can be for you.
There are obviously going to be cases where this post won’t answer every question, but I would love to help even more over in our Discord. See you there!